
Making a hiking stick | walking sticks
Using limbs or stems from trees or large shrubs
Copyright 2007 - 2020 by Mario D. Vaden
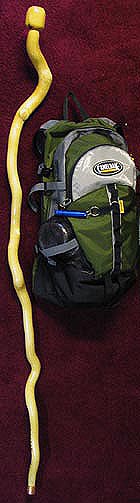
One of my hobbies over the years has been making hiking sticks for fun, gifts and my own use. Using big woody plants like maple willow, cedar, birch, Rhododendron, lilac and more. I do have a synthetic trekking pole in my collection which has a camera mount thread on top. But the same kind of gadget can be added to homemade wooden sticks: tried it myself with western redcedar and it worked excellent.
These are basics about my style of making hiking sticks: streamlined and fairly durable. It's easy to produce fine looking walking sticks without investing too many steps in the finish process.
I read that one person dried diamond willow for a full year. Another person put more finish on hiking sticks than manufacturers put on furniture. They must look great, but could be "over-cooking the grits" if you want to use them: poke in a stream, tap on a chunk of bark, toss it across some rock.
My method requires minimal drying time and a few coats of finish. If a stick gets scratched, it can always be sanded and refinished in minutes.
You can make a hiking staff from many kinds of stems or branches. Most people don't lean much weight on hiking sticks or use them like pry bars, so most species of wood will work. But the heavier the wood, the more tiring the hiking stick will become.
My lightest hiking stick so far was cedar. It even felt fragile. But since it was not used to pry with, it easily withstood several gruelling off-trail bushwhacks in Redwood National Park.
Experiment - let a piece of branch dry for a while, then practice walking with the unfinished piece to see if the weight is comfortable. One I dried, was Japanese maple, which was too dense and heavy for making a hiking stick.
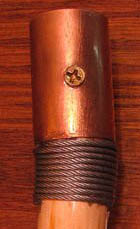
The 1/16 inch aircraft cable wrap in the middle photograph is just an experimental accessory that I tried on one hiking stick. That is not my routine. But it can be fun to try a few ideas.
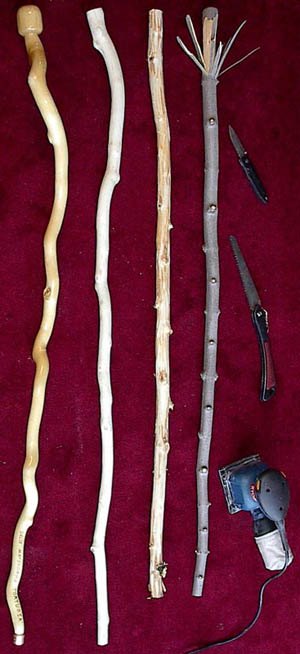
In the bottom photograph are walking sticks in 4 stages, from 4 different species. From left to right they are corkscrew willow , vine maple , white birch and red maple.
The walking stick in the top photograph is from corkscrew willow has a walnut knob. That was my first attempt at a knob on a stick. It looks okay, but doubled the the project time. These days I prefer to just go with a simple walking stick from one species.
The process is simple ...

advertisement
1. Selection. Pick a section of branch or stem that is long enough.
As a gauge, measure from the ground to your outstretched hand when your arm is bent. Measure with your upper arm pointing down and your forearm horizontal or parallel to the ground. Then add a few extra inches.
Remember, if you are hiking downhill, you need extra stick length. And you need some extra stick length anyway, because most people will want to hold the pole with the forearm raised higher than just parallel to the ground.
2. Remove the bark. This can be done by whittling.
In Spring, bark may peel right off. Hold the blade at a slight angle and use gentle strokes. The deeper you hack into the wood, the more work you will have to sand for a smooth finish - so take it easy. Wet fresh bark is easy to remove. Dry bark is seems much harder to remove. In fact, removing dry bark is miserable from my point of view. Wet wood and bark is naturally lubricated by the water that remains prior to drying. Use it to your advantage.
3. Dry the wood. Place the stick with bark removed in an area of the house or shop that is about 55 to 70 degrees for maybe 4 to 7 days. Don't rush drying like placing wood in hot sun. Slower drying will reduce cracking. Some people will coat the ends of wood to slow drying and reduce cracking, but if bark is removed, that is not very useful. If the certain genus of wood cracks a lot, try drying another piece at a cooler temperature. You may want to save an extra few inches or foot of length too, and trim later.
4. Add a tip. Shape the end and add a protective sleeve. My favorite tip is a copper plumbing sleeve usually used to connect 2 pieces of copper pipe. This tip prevents the end of the hiking stick from splitting. It the sleeve becomes damaged, a new one can replace it. The copper tip can be secured with a few screws. Sometimes I use hot glue.
You could add the tip after sanding too. I typically add the tip first and sand it too.
5. Smooth knots. Sometimes its inconvenient to smooth knots or stubs where twigs were, using a knife. On my bench grinder, I used one grinding wheel for smoothing wood like this. A flat wood rasp could work too. Or, just whittle what you can and sand.
6. Sanding. The usual method - start with coarse grits and work down to fine grits. For ease of sanding, the soft wood of western red cedar was very nice. Finding a sraight piece from that species is not easy. But arborvitae is in the same genus, and that plant can provide many nice sections of wood. It is a popular hedge.
7. Clean the wood. Wipe or blow away the sawdust. Do not use a wet rag. The water will raise the grain and make the finish rough again.
8. Hang. Twist a small hook into the tip of the walking stick to hang it upside down for finishing.
9. Finish. Some people prefer linseed oil, which I found superior for wood tool handles. For walking sticks, I prefer full gloss polyurethane in spray cans. 4 coats is usually enough. Lightly sand between each coat with 200 to 400 grit.
But if you want to use a stain, linseed oil, or other, it should be fine.
10. Complete. Remove the hook, and the stick should be ready. One thing I do to some hiking sticks after sanding and before finishing, is wood burning the genus and species name - as well as sign and date it.
A leather strap from a craft store might make a nice addition - just drill a hole where you need it.
Now you have a walking stick that will last for decades. If you touch-up the finish every year or two, you can pass it down to another generation. With care, these could last for centuries. If the stick is well done, you may want to sign your name for this reason, for nostalgia.
A few of my experiments made great decorations in corners of rooms. Some that were too heavy. Others that may have been too short. The experiments rarely went to waste. One of the most interesting looking woods after sanding was Japanese maple, but much too heavy for hiking with. Like a few others, it decorated a corner of the home.