
Making natural wood parrot and bird perches
by Mario D. Vaden
This is a companion page to Safe Woods for Pet Birds
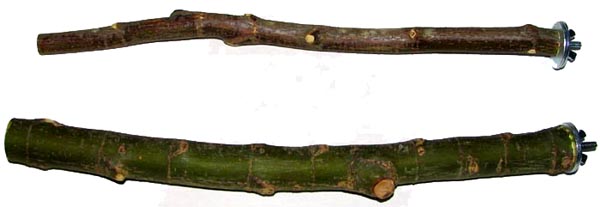
The photos below illustrate one way of making bird perches. Another option is carving or shaving the ends of sticks and branches to wedge them between cage bars and fasten with leather or material. But the hardware method does allow the perches to be anchored very firmly. For the method below, select safe non-toxic wood and use stainless steel hardware. That's stainless steel washers, and whatever metal the bird can reach - but usually the washers. A few birds don't mess with the metallic stuff, but others do.

advertisement
The methods below will work for both ends of a long perch if you take your time to measure - maybe even trimming the length twice as needed in small increments. After you find your perch wood, about the only other supplies needed are the hardware pieces.
Parts:
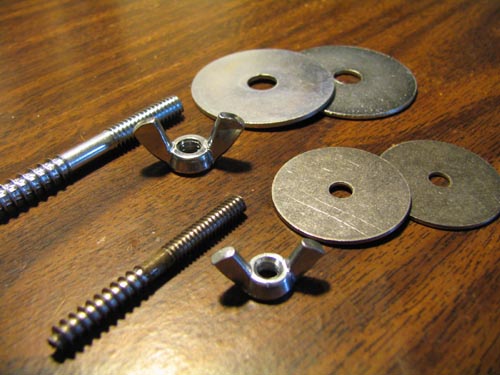
1. Washers. These in the photo are called fender washers.
These need to be big enough to span across the cage bars without slipping off. So measure the bars first - the width of the cage between the bars.
The washers have to be stainless steel to reduce or prevent the risk of zinc toxicity; a hazard with zinc fender washers. Match the center hole size to the hanger bolt - item 2.
2. Hanger bolts. That is the threaded piece of hardware with a screw or lag type thread at one end and a machine thread at the other.
The machine thead end stays on the outside of the perch.
3. Wing nuts. I suppose you could use hexagonal nuts, but wing nuts are more convenient for many people.
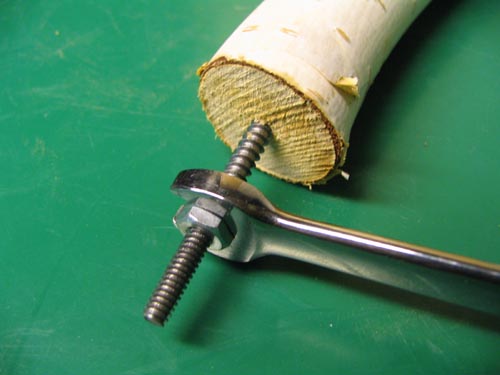
If you use hex nuts, two of them can be used together to thread the hanger bolt into the perch wood with a wrench. See one of the images below.
At least in our case, the birds could only reach the washers. We bought stainless steel washers and were not too concerned about the metal content of the wing nuts or hanger bolts since those were out of reach on the outside of the cage.
These items (washers, nuts and hanger bolts) are available at most hardware stores. Sometimes the smaller hardware stores have a better selection of special hardware, or can order the pieces.
Be sure to match diameter of the washer hole with the hanger bolt diameter. Also check to see that the nut threads on the hanger bolt before you leave the hardware store.
Many of these items are available by the box or the bag, in quanties like 50, 100, or more.
The cost per piece was a lot less for the ones we bought when all of them were ordered by the box.
Smaller perches won't need as large of hardware as larger perches. When the length of a large diameter perch exceeds 12", you might consider extending the perch completely from side to side, with a hanger bolt at each end.
Bigger birds also weigh more and can put more pressure on the hanger bolt.
The perches in the top photo are about 14" long, and were for cockatiels. I recall using 1/4" hanger bolts for those. Had those perches been for our African grey parrot, 3/8" hanger bolts would have been our choice.
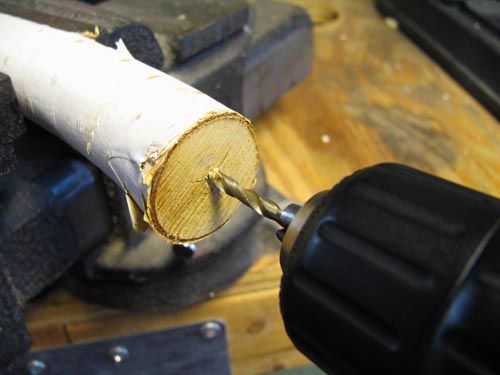
Predrill a hole in the perch before threading in the hanger bolt. If you don't predrill, the perch can split, similar to how splitting wedges will divide firewood.
Make sure the hole is big enough to start threading that hanger bolt in. But not so large that the hanger bolt will loosen; causing the perch to rotate free. Keep it firm.
If you hold the hanger bolt up in front of a window or light source, you will be able to see the inside diameter of the shank along the threads. You can hold a few drill bits in front of the hanger bolt, until you find a bit that's the right size.
You don't want a drill as large as the outside diameter of the threads. That's too bif of a bit.
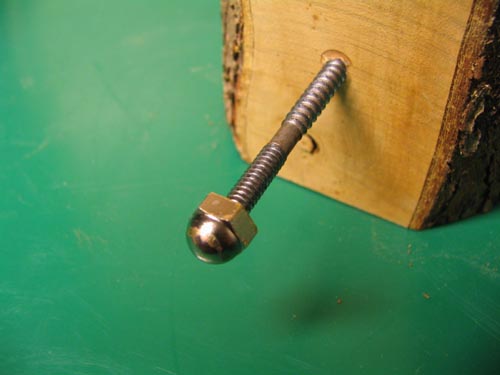
Hopefully its obvious, but you will be threading the "screw" resembling threads into the wood, not the "machine" threads. The threads for the nut are usually more numerous and closer together. Those stay on the outside for the nut, and the coarse threads spaced farther apart, thread into the wood. Those appear to spiral slightly.
Once you get your hanger bolts, you'll see that there is no end to use a tool for driving it in. Not unless technology changes.
It's not like a screw that has an indent for a screw driver, or a nut or bolt with a head for a wrench.
One way to thread the hanger bolt into the perch is with a nut that's closed on one end. It's an option, but those nuts are a tad bit spendy. If you will make several dozen, that may be desireable, since you can use a nut driver on the end of a drill or cordless screwdriver.
But you need to drive the hanger bolt gently if you use a closed-end nut. Otherwise the hanger bolt can punch out the end of the nut.
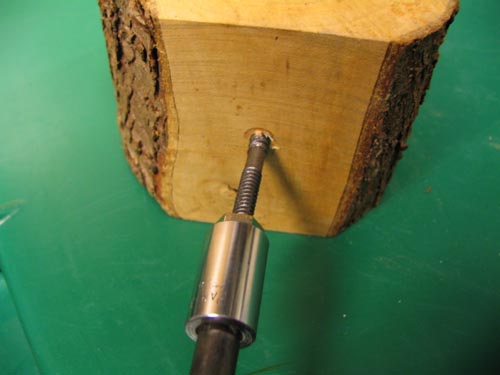
You can drive the hanger bolt in using a socket on a drill attachment as shown, or with a hand held nut driver, or wrench.
If you use the drill, go slow, not just to avoid damaging the nuts. You don't want to drive the hanger bolt too deeply into the hole. If it threads in too far, you may have to damage the machine theads with pliers to get it back out. Typically, these don't "back-out" of the hole well with wrenches and nuts.
You would need to clamp pliers directly onto the threads and reverse the hanger bolt out of the hole. And these hanger bolts are not inexpensive. Probably 25 cents to 50 cents apiece (2005 price).
You want to drive the hanger bolt in just enough to hide the coarse threads. And possibly the short segment without threads which is between the two types of threads.
Turn the hanger bolt and drive it in until the screw type thread dissappears into the perch and maybe and extra eighth of an inch. Hopefully the hole is the right size, and not drilled too big.
If you accidentally drilled the hole too big - making the hanger bolt loose - you have at least two options. One option is cutting one inch off the perch and drilling again with a smaller bit. The other option, is sliding a small sliver of wood into the hole, or a couple of wooden toothpicks. Sometimes that will work.
You can also thread-in the hanger bolt using two nuts and a wrench. Actually two wrenches.
You thread both nuts on slightly, one against the other, and holding one nut in place one wrench, you clamp the second nut tight against it with the second wrench.
Then, you should be able to turn the outer nut, or both nuts with the hanger bolt rotating its way into the hole. Once the hanger bolt is threaded in, use two wrenches to separate the two nuts.
If you don't have extra nuts at home, be sure to pick up one or two of the right kind from the hardware store before you go back home. The small nuts seem more susceptible to having the threads strip. Keep one, two or a few extras on hand.
Don't use any oils to lubricate the hardware or the hole in the perch before threading. At least not petroleum oils or sewing machine oil. A bit of vegetable oil or something like that might be okay, but shouldn't be essential.
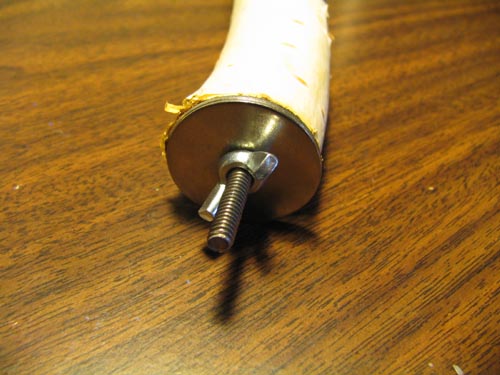
Once the hanger bolt is inserted and you are readyy to mount the perch, slide on the STAINLESS STEEL washers and the wing nut.
One washer goes on first, then a second washer on the outside of the cage.
You could skip the washer on the inside of the cage, but if you don't use it, that means your birds can gnaw the end of the perch a lot easier without the metal obstacle.
In case you are concerned about your clothes getting ripped or someone getting snagged on the protruding hanger bolt: put several extra regular nuts on the hanger bolt before the wing nut is threaded on.
If you find a well stocked hardware store, they should carry small parts called "thread protectors" which slide onto the end of threads (bolts) to protect threads. These also provide safety by covering the exposed threads.
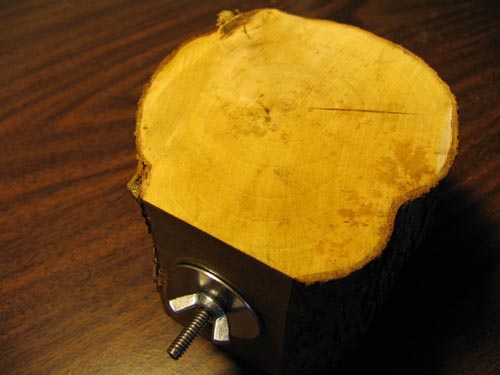
Our small birds really loved a small "chunky" or stubby kind of perch - I just called them "bird pods" - cross cut sections from small tree trunks.
VERY IMPORTANT:
If you make these and cut the wood too thin - it cracks. In fact, you can see from this photo that a tiny crack is present. Make sure that the wood for these is cut no thinner than 3 to 5 inches.
Also, the faster the wood dries, the worse it will crack. Dry the wood slowly. Don't put it in a warm laundry room. Put it in an area where the wood will dry out in 2 to 3 weeks.
Now, about the cracks. You are almost certain to get some kind of small crack. That crack can catch a bird toe or toe nail especially where the crack tapers to a wedge.
I understand that a glue like elmer's school glue is not toxic to birds. Squirt a tiny bit of that kind of glue into the crack. Then, while the glue is still wet in the crack - rub sand paper over the top of the "pod" perch and let the fine sanded wood particles push into the glue in the crack. That will fill the crack and eliminate the toe-trapping gap. The glue will need to dry overnight before installing in the cage.
Occassionally, one of these develops cracks too large to fill. In that case, toss it away. But, if you don't cut the wood too thin, odds are your pod perch will be fine. The birds may not be able to reach the washers with this kind of perch. In that case, zinc might be okay. On the other hand, if all perch washers are stainless steel, you eliminate the hazard of mixing them up during cage cleaning or cage rearrangement, or if you discard an old perch and recycle the washers. A magnet will generally pick out a zinc washer and leave stainless steel alone.